Frogging isn't always an option when you want to make alterations to the length of a sweater. It may've been worked bottom-up, in a grippy yarn (like mohair or suri), or you just don't have the patience to re-knit it when you're done. Sweater surgery is, relatively speaking, a quick and easy option.

These are my two versions of the Cosy Classic Raglan, one in our Simple Sock and Suri Silk held double (blue), and the other in DK (black). When I made the DK version I realised I preferred the cropped length and wanted to shorten the other to match. The before/after doesn't look like much, but it made a big difference to the way it hangs. Rather than bunching at an awkward point on my hips, it now hangs just below my natural waist. I decided to cut out the excess stocking stitch just above the ribbing and graft it back on in a higher position. When I shared snippets of the process on instagram I had a few requests for a tutorial, so i'm going to attempt to explain!
As an overview, you'll pick up two separate rows of knitting. The area between these rows will be cut away. One will be at the point you want to re-attach the ribbing, and the other one, a few rows above the ribbing. It's easier to graft two rows of knit stitches, so pick a row you can clearly see, away from any purl stitches.

To do this: use a separate circular needle (with appropriate size tips and cords) for each row and pickup through the right-hand leg of the knit stitches as they face you. Be careful to keep to the same row of stitches. If you can, try to start and end at the beginning of the round (for me, this was the centre-back of the sweater). It isn't crucial at this point and you can tweak it when both rows of live stitches are back on the needles (as I did - below).

Now you're ready to cut! Snip into a stitch two rows below the top needle. This ensures that, once you've unravelled back to the live stitches, you'll have a long enough tail to complete the Kitchener stitch. Then cut a stitch two rows above the bottom needle and unravel back to the live stitches. Discard and recycle the excess wedge of stocking stitch.

This is a good point to make sure the stitches are orientated correctly on your needles, re-arrange them to the beginning of the round, and make sure both rows correspond - as closely as possible!
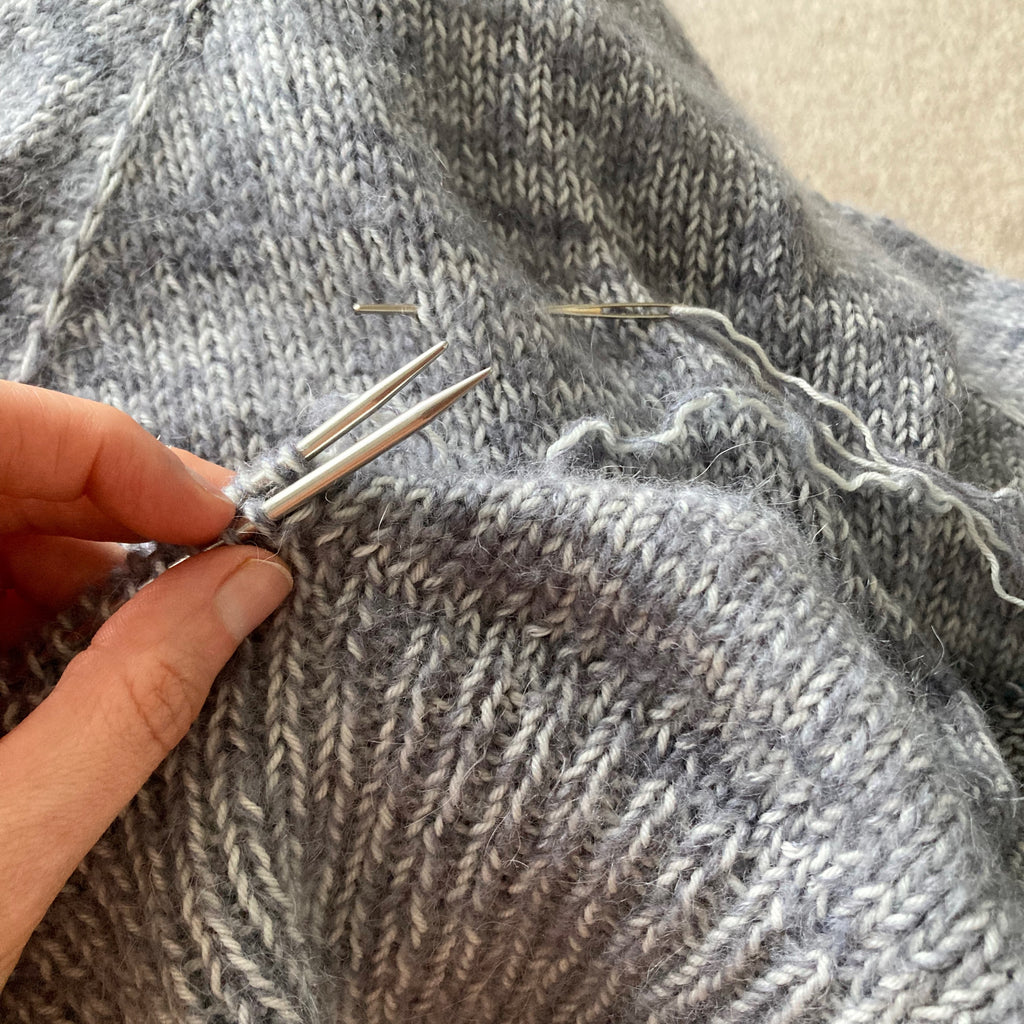
Thread one tail onto a yarn needle and, holding the corresponding needles together, work Kitchener stitch around the circumference of the sweater. I recommend doing this in one sitting, without distraction, and chant the steps as you go 'knit, off, purl' - 'purl, off, knit'. Try to keep the yarn taught so your stitches match the tension of the sweater (above).

At the end, weave in the tails and you're done! To be extra picky I ripped back a few rows of ribbing as well, to balance the proportions, and re-worked the tubular cast-off (above).

If you're lengthening the garment, snip into the row directly below the top needle as you won't need a tail at this point. Continue knitting for as long as you need and graft the ribbing in the same way.
This obviously works best on a sweater/area of a sweater that doesn't have any shaping, so you're dealing with the same number of stitches on each needle. It can apply to any type of project, too. I used it to re-work a pair of socks, cutting out the frayed 'fish lips kiss' heels and working a heel-flap and gusset, before grafting the feet back on. This also served to lengthen the leg of the sock, which was a welcome addition (below).

I really hope this helps to get some lingering projects worn again. Happy cutting!


3 comments
Thank you for the directions!
Hi Jeanie! Sorry for the delay – yes, I think that would be the neatest way to do it.
What if my sweater has side seams? I assume I’d have to unpick the seams and shorten the front and back separately then sew them back together when done?